How to Change Your Hotend Nozzle Tip
- Anna Eunhae Lee
- Nov 11, 2019
- 4 min read
Updated: Oct 29, 2021

When to Change your Nozzle?
Keeping your nozzle fresh is a crucial step in obtaining clean prints.
Nozzles will generally wear out over time as you print and extrude filament, and the more you print the faster your nozzles will wear out. There are certain things that cause wear to happen faster, such as printing with abrasive materials like Carbon Fibers, Metalfills, and Woodfills.
As you print, the particles in the filament will slowly erode the walls of your nozzle, increasing the opening size and creating an inconsistent shape. This can cause a lot of issues and potentially ruin your print.
Some of the side effects include (but are not limited to):
Clogging Nozzle
Bad First layers
Excess Stringing
Globs and Pimples on your Prints
Poor Layer Bonding
Types of Nozzles and which should you choose?
There are many different kinds of the nozzle, from materials to size.
And choosing the right nozzle is generally determined by a few factors, such as:
What material are you printing with?
What are you printing?
How fast do you need it done?
Since certain materials are considered “abrasive”, they can wear down standard brass nozzles faster than usual. For this reason, many companies offer abrasion-resistant nozzles made of materials like hardened stainless steel or even sometimes ruby!
All nozzles also come in a variety of “Nozzle Diameters”. The Diameter refers to the size of the opening at the tip of the nozzle. The smaller the diameter, the more detail, but the slower you can print. The larger the diameter the less detail, but the faster you can print and the stronger your print can be.
The standard nozzle that’s packaged with your gMax printer is a 0.5mm nozzle, which is a perfect size for most printing and everyday use.
Changing Your Nozzle
The Tools You’ll Need
Before we get started we need to gather our tools (don’t worry, there’s only two).
Most nozzles can be removed with:
A 7mm hex socket wrench (or pliers will do if you don’t have a hex socket wrench available).
A 16mm or adjustable crescent wrench.


Step One: Remove the blue silicone sock and heat up your nozzle.
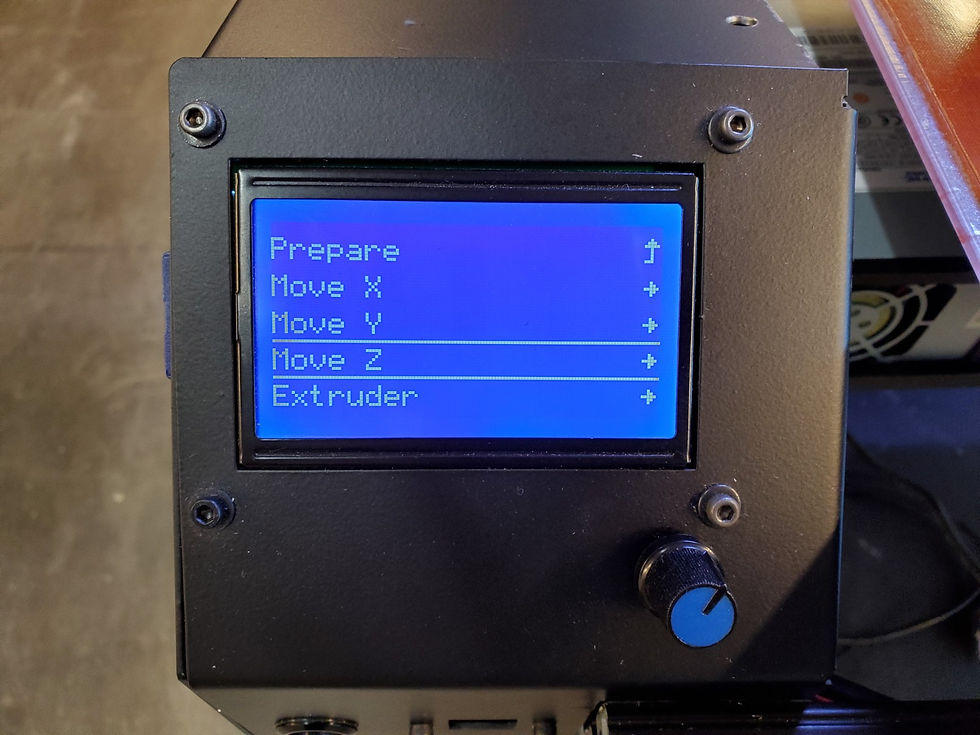
Go to your LCD Screen > Prepare > Preheat PLA (if you regularly print higher temperature materials then use the Preheat ABS option).
You want to avoid heating up too much since this will increase the risk of damaging the throat (heat break) and other components during the installation process.
Be extra careful from this point on since the heater block and nozzle will be VERY hot.
Step Two: Raise your Z-Axis so that you can clearly see your nozzle.
Go to your LCD Screen > Prepare > Move Axis > Move Z

Step Three: Carefully remove the nozzle.

Once your nozzle is sufficiently heated up, use your crescent wrench with one hand to firmly hold the heater block in place.
With your other hand, take your hex socket wrench or pliers to loosen the nozzle by turning the nozzle clockwise until it releases.
When removing the nozzle, be careful about not allowing any of the wires touch the heater block.
The (very hot) nozzle will fall unless you catch it with something. As E3D cautions, don’t let it fall on you or something flammable.

Step Four: Install new nozzle.

Place your replacement nozzle into the hex socket wrench and thread it back into your hotend using a counter-clockwise motion.
If you are not experienced with working around a hotend while it is hot, E3D recommends cooling down your hotend before inserting your new nozzle. Once it is cool, get the thread started up again. Once the nozzle is inserted, you can heat it back up and finish threading the new nozzle.
Caution: Be careful to not apply too much force or overtighten your nozzle when installing as this could damage the throat (heat break) as this is a fragile component of your hotend. Overtightening can also damage your heater block or the nozzle itself.
It is better to have your nozzle be on the looser side because you can always tighten it later. Overtightening could result in damage to your hardware that would require having to buy new parts.
Step Five: Purge and done!
Once your new nozzle is installed, run some filament through it to make sure everything was installed properly and it purges smoothly. We recommend letting the hotend cool down before putting the silicone sock back on.
After that, Happy Printing!
What to do if your heater block gets loose
Sometimes while changing nozzles, it is possible to accidentally unscrew the heat throat from the inside of the heat sink. This can happen if you overturn the heater block while tightening the nozzle. The video linked below shows a great example of how the inside of your E3D Hotened works.
Here are a few steps on how to tighten your heater block on your gMax 2
1. Raise your printer by 200mm.
2. Turn your printer off and remove the blue E3D sock off the heater block
3. Remove the dark blue E3D active cooling fan from the heat sink.

4. Grab a 3mm hex key and loosen the screws to the hotend adapter plate but do not remove the screws. Loosen the screws enough so the heatsink can spin
5. Now that the whole E3D assembly is loose, turn on your printer and go to Prepare > Preheat PLA > Preheat PLA End.

6. Make sure the nozzle base is sticking out the heater block by approximately 1mm.

7. After the hotend heats to 200ºC, grab some heat resistant gloves or a pair of pliers and grip the heater block. Be very careful to not burn yourself throughout the rest of the steps
8. Spin the heatsink clockwise while making sure the heater block is stationary. The heatsink may be warm or even hot, so please proceed with the proper safety equipment (heat resistant gloves). Spin the heatsink until it locks with the heater block tightly.

9. Tighten back the hotend adapter plate while keeping the heater block in the correct orientation.

10. Run a filament purge (gMax Tools > Purge PLA) and make sure there are no leaks.

11. Cooldown your printer and reattach the E3D Sock and active cooling fan.
After following these steps, your heater block should be tight and straight!

Happy printing!


Comments