How To 3D Print Full Metal - TVF Copper and Bronze On The gMax 2 PRO - Part 1: Slicing and Printing
- Gordon LaPlante
- Oct 17, 2022
- 4 min read

Updated: Oct 25, 2022

Who doesn't want to 3D print real metal functional parts? With the Virtual Foundry metal filaments and a gMax 2 PRO 3D printer, now you can. We experimented with 3D printing bronze as well as copper filaments and turning them into full metal prints. The results are quite amazing.
In part one we will go over slicing tips, printer setup, and the printing results. We decided to test a few models with different thicknesses, densities, and overall detail to compare the results.
Overview
Test Models:

Bronze parts:
T-Rex Skull:
Bottle Opener:
Octopus Phone Stand:
Copper Parts:
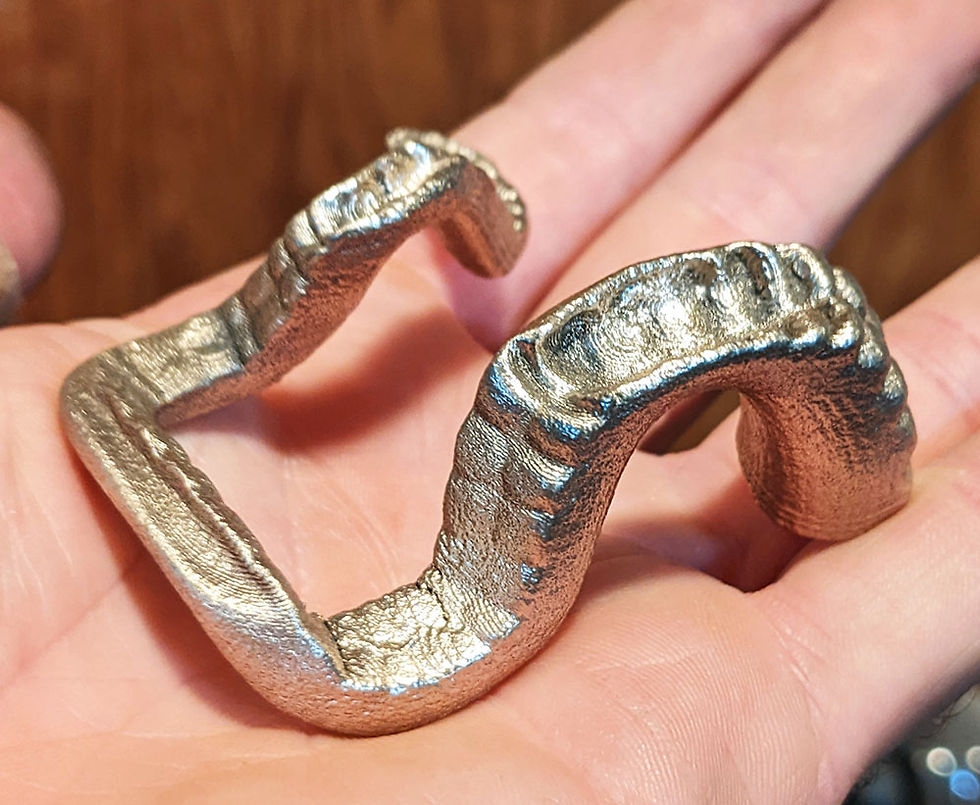
Steampunk Handles:
Medusa Keychain:
Aztec Gold Coin:

Printer:
Slicing Program:
PrusaSlicer 2.5
Filament:
The Virtual Foundry (TVF) Copper and Bronze Filamet
Slicing Settings
All models were sliced in PrusaSlicer. Many of the settings are similar to PLA, however it should be noted these filaments tend to leak, even with high retraction. We've found that models requiring support are more difficult to prepare for 3D printing in general, since the support fuses to the part.


Basic settings:
0.4mm or 0.5mm nozzle
100% infill or a high number of perimeters (If the parts have less than 100% infill, they can shrink as you debind)
0.16 to 0.25mm layer height
1.0 to 1.25mm retraction
50-60mm/second general speed
40mm/second perimeter speed
Additional tips:
This filament tends to string a lot! Turn on "avoid crossing perimeters" to reduce external stringing but you can also easily clean it up after printing has completed.
Your parts can shrink up to 17% in the XY direction and 20% in the Z direction so make adjustments to your model as needed. Some of our small thin models had little shrinkage but larger masses tended to shrink a lot after debinding.
Cooling doesn't seem to be an issue so you can keep the fan either off, or keep it low.
You do not have to dehydrate the filament.
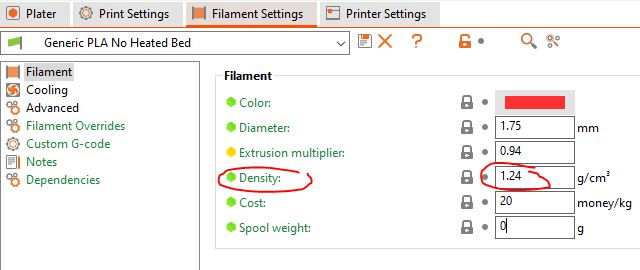
We recommend you update the filament density in the slicer to get a more accurate weight prediction. In PrusaSlicer, you can find this in the filaments tab.
Bronze has a density of of 4.29g/cc - 4.5g/cc
Copper has a density of 4.8g/cc - 5.0g/cc

gMax Printer Preparation

We used our aluminum reinforced cold acrylic bed with blue painters tape (the painters tape is to avoid having the filament fuse to the acrylic.) You can also use the heated bed with the heat off.
The painters tape can be easily removed from the part after printing has finished.

Note: TVF filament can be brittle and it can break as it comes off the spool.
If your filament is brittle, it is recommended to use a filament warmer to help the filament to straighten out as it is printing. We used a simple space heater pointed at the spool to heat it up to make it malleable as it comes off the spool. Don't over heat or you risk changing the filament diameter.

You can also use a filament warmer, such as the Sunlu filament dryer, to warm up the filament during printing.
Just make sure the filament has a direct path to the extruder to avoid breakage.
The Virtual Foundry Bronze and Copper Filamet TM
So what exactly is TVF filament? Well we first received our samples after pledging on their kickstarter campaign back in 2015. The material is called Filamet and we were excited to test the filament out! Since then we obtained a few more test spools after talking to them at MRRF over the years.

The material is open architecture, meaning you can use your choice of equipment to print, debind and sinter. This is especially nice if you already have a programmable kiln since you won't have to send your part out.
Also, since all materials are made in the same way, TVF mentioned they can load the filament with nearly any base material. They have tested molybdenum and bismuth as a couple of examples
Currently, they have a range of different metals with different debind and sinter times as well as oxidation constraints.

From TVF website:
Copper specs: This filament comes in 0.5kg and 1kg spools and 1kg bags of pellets. It contains 87.0% - 90.7% metal and has a density of 4.8g/cc - 5.0g/cc.
Bronze specs: This filament comes in 0.5kg and 1kg spools and 1kg bags of pellets. It contains 88.0% - 90.0% metal and has a density of 4.29g/cc - 4.5g/cc.

One of the early copper sample packs we received broke a lot from the time we received it until we printed with it, so we had to feed short segments into the printer and pause in between but overall it did work.
Our newest order of filament is much more malleable and has a much lower chance of breaking.
3D Print Results on the gMax 3D Printer
Make sure to keep an eye on the filament as it prints. Metal filaments can be a little tricky, especially since you need to print with 100% infill. Sometimes the print can clog due to the density and backpressure.
Printing with a 0.5mm nozzle helps with clogging but it will result in slightly more stringing.


The bronze parts were printed with 90% infill to test shrinkage. The copper parts were printed with 100% infill.

Once the printing has finished, make sure to clean up the part and remove any stringing prior to the debind process. It's much easier to clean up the part now.
You can use a simple metal brass brush and tweezers to brush away the extraneous filament. You can also sand the prints with 240-320 sand paper at this point if needed.
At this point, the parts are considered "green" 3D prints. They will be brittle since they haven't had the binder burned out or been sintered yet.

Conclusion of Part 1
3D printing using the Virtual Foundry metal bronze and copper filaments can be achieved with a little patience and the right settings. In all of our printing tests, we had a few of the filaments clog but that was resolved with increased speed, a larger nozzle, or less frequent retractions.
Overall the printing was fairly easy and we are ready to move to the next step.
Next we will debind and sinter the parts in a programmable electric kiln. Then we can try polishing and milling them!
Comments