How to Avoid Warping on Large 3D Prints
- Gordon LaPlante
- Jan 7, 2021
- 3 min read
Updated: Feb 21, 2022

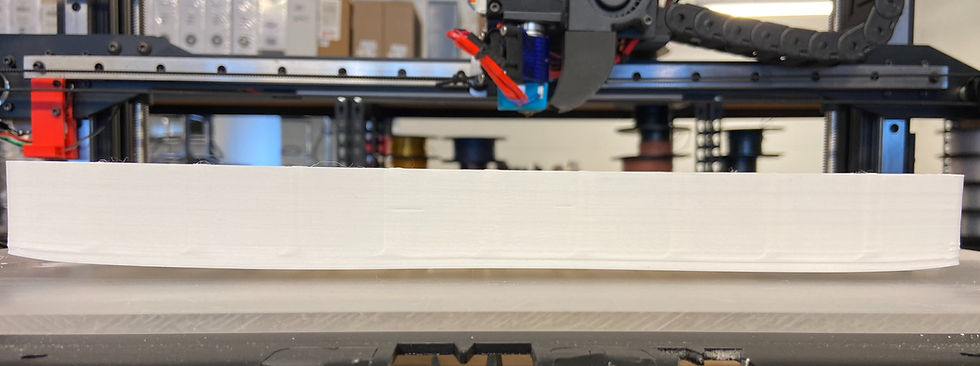
Warping can happen on any print with a higher chance of it happening on larger prints if you are not careful or have the wrong settings for the model. Warping occurs when the filament cools as the print gets higher up causing it to contract. This happens for a variety of reasons outlined below.
Use Different Infill With Less "Stress"
Very high stresses can build up in your model as the infill is cooling. When using grid or triangle infill, long straight filament is being extruded and as it cools it will pull the edges of the 3d print together resulting in warping.
To reduce this stress you need to use an infill that is not in a long straight line Switch to an alternative infill with less internal stresses such as gyroid (Cura) or honeycomb.

Refer to this article for more information on infill: Infill Basics
Brims and Corner Feet

A technique you can do before printing to prevent warping is to include a Brim or corner feet to your model.
A Brim is a layer of material that extends along the print bed from the edges of your print (Fig. 1.2). In some cases this is called a skirt just make sure to set the offset from the part to zero and we suggest setting the brim count 10+ for large prints.

Corner feet can be used to add material to the sharp angles of your model, such as corners (Fig. 1.3). Simply drop in a 3d model of a box that is only 1 layer thick. You can adjust the other scales in your slicing program. Once the print completes cut away these corner feet with a knife.
These two techniques will improve adhesion, prevent warping, and will require less material than using a raft. We often use a combination of these two techniques for large prints.
Print Cooling Too Fast
When the material you are using cools down too fast, it does not have time to settle appropriately. The material then cures/cools down too quickly making it shrink (see Fig. 1.4). As the print job continues, the material will keep contracting until it eventually pulls the print off the bed. The solution would be to lower the part cooling fan percentage in your slicing program.
Cooling Fan Settings
Check your cooling fan settings. Usually, for the first layer, cooling is off to ensure proper adhesion.
Using a cooling fan at a high speed will bring down the temperature of the material you are using too fast, which will not let the material settle at the position it was printed but instead, it will make it shrink.
Note: cooling settings are dependent on the material you are using. These are the settings we like to use


Improper Bed Leveling

Sometimes when the print bed is not leveled correctly, one side of the print can be higher than the other side. This can affect bed adhesion.
In Fig. 1.7, you can see that the left side of the print was higher than the right side.
In this case, Bed Leveling may help fix the issue.
The gMax 2 offers 81-point bi-linear mesh bed leveling that can be saved to memory. This can be easily found on the LCD screen from "Prepare > Level Bed". Once complete you can go to "Control > Store Settings" to ensure the bed leveling saved to memory.
First Layer Adhesion
Make sure to have a good first layer and a clean print surface. Your first layer print will be the foundation of your print and without a clean surface, your print will not have a good surface to adhere to.
If you are using acrylic, make sure to sand the bed and wipe it clean prior to any large prints.
After the print has already started, you can adjust the nozzle height by doing a “Live Z-Adjust” in your Tune menu to get the right first layer height.
You can also increase the first layer temperature slightly to improve adhesion, just make sure not to go too high or the print might fuse to the bed.
For more information, check our website about achieving the perfect first layer (https://www.gcreate.com/post/achieving-the-perfect-first-layer).
Heated Beds
Use heated beds only for specific materials that require heated beds, such as ASA, ABS, and PETG.
Heated beds will maintain the temperature of the filament, allowing adhesion between layers and reducing shrinkage.
Every gMax 2 Heated build plate set comes with a sheet of genuine BuildTak PEI (For more information, visit https://www.buildtak.com/product/buildtak-3d-printing-surface-pei/).
For PLA and TPU, your acrylic bed will be the best option to use.
Alternative Adhesives
Lastly, if you want to ensure adhesion, you can apply an alternative adhesive of your choice, such as purple glue stick or hair spray on the bed to help to prevent warping.
Once your print concludes, make sure to clean the printing bed from any adhesive used and apply a new coat if desired.


Comments